
# React Native 开关组件 Switch
如果要在两个值之间切换,或者要在两个状态之间切换,我们可以使用 React Native 提供的 开关组件 Switch。
开关组件,顾名思义,就像我们日常电灯的开关一样:按一下开,再按一下关,再按一下又开。
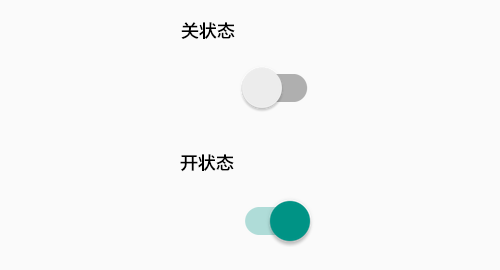
开关组件 Switch 在 Android 端的样式如下
# React Native 开关组件 Switch
# 引入组件
import { Switch } from 'react-native'
# 使用语法
<Switch
   onValueChange = {function(value){}}
   thumbColor    = {color}
   trackColor    = {{false:color,true:color}}
   onChange      = {function(event){}}
   value         = {true|false}/>
2
3
4
5
6
Switch 只有两个值 true 和 false,都是布尔类型。
true表示开关的 开状态。false表示开关的 关 状态,默认值。
这两个值是固定的,我们不能变更。
如果我们要改变开关的初始状态,可以使用 value 属性来设置初始值,不过只能设置为 true 或 false。
注意:
value是必填属性,如果不设置,开关的状态看起来用于处于 关 状态。
Switch 还有两个事件回调函数 onValueChange 和 onChange。前者当开关的值发生改变时触发,参数是 开关变更后的新值。 后者当用户尝试改变开关状态时触发,参数是 事件。
开关的外观基本是固定的,我们不能改变,唯一能做的就是改变颜色。这里有三个颜色可以改变,一个是导轨的颜色,分为 开 状态下导轨的颜色和 关 状态下导轨的颜色。还有一个是 滑块 的颜色。
因此,如果你要设置导轨的颜色,需要传递一个对象,格式如下
{false:color,true:color}
例如
{false:'#eeeeee',true:'#333333'}
当开关处于开状态下时的导轨颜色为 #333333,处于关状态下时的颜色为 #eeeeee。
# 范例 1 : 最基本的使用
React Native Switch 最基本的使用,仅仅作为状态展示组件,那么只需要一个属性即可,那就是 value 用于设置开关的初始值。
# App.js
import React, { Component } from 'react'
import { View, Text, Switch, StyleSheet } from 'react-native'

export default class App  extends Component {
    constructor() {
        super();
        this.label = {false:'关',true:'开'}
        this.state = {
            switch1Value: true,
        }
    }

    render() {
        return (
            <View style = {styles.container}>
                <Switch
                    value= {this.state.switch1Value}
                />
                <View>
                    <Text>Switch 当前的状态是:{this.label[this.state.switch1Value]}</Text>
                </View>
            </View>
        )
    }
}

const styles = StyleSheet.create ({
    container: {
        flex: 1,
        alignItems: 'center',
        marginTop: 100
   }
})
2
3
4
5
6
7
8
9
10
11
12
13
14
15
16
17
18
19
20
21
22
23
24
25
26
27
28
29
30
31
32
33
运行效果如下,这时候无论怎么切换状态,都是处于 开 的状态。
# 范例 1 : 可响应状态变更
Switch 组件如果要响应我们的触摸操作,就需要使用 onValueChange 来设置 value 的值。
# App.js
import React, { Component } from 'react'
import { View, Text, Switch, StyleSheet } from 'react-native'

export default class App  extends Component {
    constructor() {
        super();
        this.label = {false:'关',true:'开'}
        this.state = {
            switch1Value: true,
        }
    }

    toggleSwitch = (value) => {
        this.setState({switch1Value: value})
    }

    render() {
        return (
            <View style = {styles.container}>
                <Switch
                    onValueChange = {this.toggleSwitch}
                    value= {this.state.switch1Value}
                />
                <View><Text>Switch 当前的状态是:{this.label[this.state.switch1Value]}</Text></View>
            </View>
        )
    }
}

const styles = StyleSheet.create ({
    container: {
        flex: 1,
        alignItems: 'center',
        marginTop: 100
   }
})
2
3
4
5
6
7
8
9
10
11
12
13
14
15
16
17
18
19
20
21
22
23
24
25
26
27
28
29
30
31
32
33
34
35
36
演示效果如下
# 范例3 :定制外观
如果我们还需要对外观的颜色加以定制,可以设置 thumbColor 和 trackColor 。
比如说我们要将 Switch 的外观定制为下面的样子。
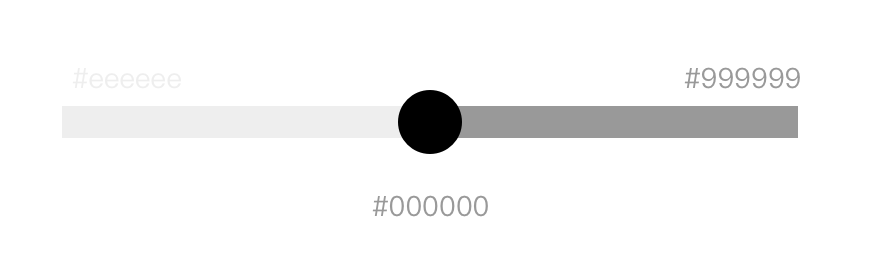
可以设置属性
<Switch
   thumbColor    = {"#000000"}
   trackColor    = {{false:"#eeeeee",true:"#999999"}}
/>
2
3
4
# App.js
import React, { Component } from 'react'
import { View, Text, Switch, StyleSheet } from 'react-native'

export default class App  extends Component {
    constructor() {
        super();
        this.label = {false:'关',true:'开'}
        this.state = {
            switch1Value: true,
        }
    }

    toggleSwitch = (value) => {
        this.setState({switch1Value: value})
    }

    render() {
        return (
            <View style = {styles.container}>
                <Switch
                    thumbColor={"#000000"}
                    trackColor={{false:"#eeeeee",true:"#999999"}}
                    onValueChange = {this.toggleSwitch}
                    value= {this.state.switch1Value}
                />
                <View><Text>Switch 当前的状态是:{this.label[this.state.switch1Value]}</Text></View>
            </View>
        )
    }
}

const styles = StyleSheet.create ({
    container: {
        flex: 1,
        alignItems: 'center',
        marginTop: 100
   }
})
2
3
4
5
6
7
8
9
10
11
12
13
14
15
16
17
18
19
20
21
22
23
24
25
26
27
28
29
30
31
32
33
34
35
36
37
38
演示